Frequently Asked Questions

Yes. The Tray Selector utility will offer you the option of setting up printing to any printer that is available on your PC. For each printer you can specify which tray to print your documents from, for the first page and then for subsequent pages.
A: Yes. Just set up a profile in the normal way, with one caveat – change the printer setup options (see help page) to print the first two pages to the first tray. This will ensure that your first duplex page is printed on both sides of the paper. We have some more information on how to setup a separate printer name/driver that just prints duplex by clicking
Yes. This is a very common request from people who have duplex printers. You need to carry out a few steps first. We have provided an online tutorial to explain how to set up your printer options to deal with double sided printer drivers here.
 

Using our printer setup utility you can have up to seven different printing profiles. You give each profile a name when you set it up: for example “letters”, “plain”, “colour”, etc. Each profile can be seen as a new button in the Tray Selector button bar. It is possible to extend the number of print profiles to 20 with a simple registry tweak. Please use the contact page to contact us for information on how to do this.

Yes, you can set up Tray Selector to print to any printers available to the PC on which the printer setup utility is installed. In fact, many of our users find this is a really useful feature. They just set up Tray Selector to allow single-click printing to a number of different printers.
 
Not exactly, each profile button can only access one printer at a time, but different printers can be used in different profiles. There is one exception. By using the “Extra Copies” section, you can set up an extra print job to another printer under the same button. Please see the help page for more details. In this way, you can setup a single click button to print your document to one printer and a copy to another but the whole document will be printed each time. You can use page selection to limit the output to the first printer however.
 
Yes. Click the settings button on the Tray Selector printer setup utility and select the profile from which you want to print an envelope. Click the button called “Envelopes”. The dialogue box shown below will appear. Check the box to enable envelope printing, and select the printer to which you want the envelope to be sent. Now, when the profile button is pressed, it will also show the normal Word envelopes dialogue, allowing you to print an envelope too. See the help page for more details. Envelope printing from word with Tray Selector

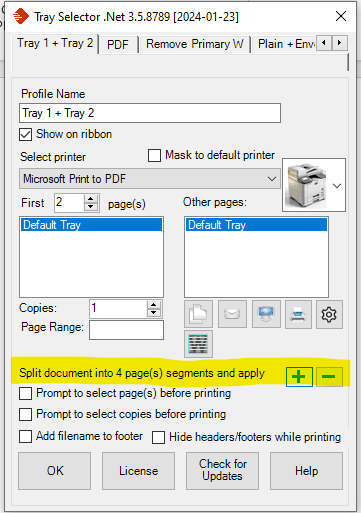
Some users have documents which repeat every X pages and they want to treat each part as a separate document, e.g. printing the first page to one tray, then the next X-1 pages to another tray, then to go back to the first tray again. To do this, just select the length of each segment as shown in the image below. Tray Selector will then split the document up into segments of this size and print according to your settings. Please note splitting is only done for the main print settings, not the extra copies.

Split a document in Word before printing

You can use a fully functional version of Tray Selector free for 7 days to see if you like it. After that, if you are satisfied with the new functions it provides, then we would ask you to pay the modest price of $4/user/month. Click here to buy.
You can buy Tray Selector by filling in this online form. Once we receive your order we’ll issue you a license key and send you an invoice that you can pay online.  Once you have licenced it you can use it after the 7-day trial period. Your subscription will automatically renew  as long as your card details are up to date.
 
You can buy a site licence for a particular number of users – just contact us using the form provided on this website and let us know how many users you would like. We provide substantial discounts for people who purchase multiple licences.
Yes, our professional programmers are always looking for new ways to improve our products. Please contact us if you have any suggestions for the future
Yes, we provide email support via our contact us page. When you purchase Tray Selector you get the first years email support and upgrades free. You can extend this after the first year if you chose to by contacting us.
Yes. Adobe provides a PDF printer driver, so you just set up a Tray Selector button to print to the PDF printer driver. There are also a number of free PDF drivers such as PDFCreator that work perfectly with our print setup utility.
Yes, there are registry tweaks that you can use to hide the settings button and also to mark profiles as read-only. Please contact us for more details.

A: For Tray Selector to be able to control your printers, the paper and tray selections within the printer driver need to be set to the defaults which are normally automatically selected when you add a printer driver using the Add/Remove Printers option in your Control Panel.

It could be that while trying to resolve the issue prior to using Tray Selector, you may have changed the printing preferences to choose a specific media type or paper tray within your driver which is now overriding the commands sent by Tray Selector.

The easiest way to resolve this is by choosing one of the two following methods:

  • Reinstall the printer driver and leave all settings as they are by default
  • Right click on your printer and choose printing preferences. Then choose Paper/Quality and make sure the Paper Source and Media type are both set to Automatic. The wording of these options will vary between printers, but you should be able to easily find the relevant settings for your printer.

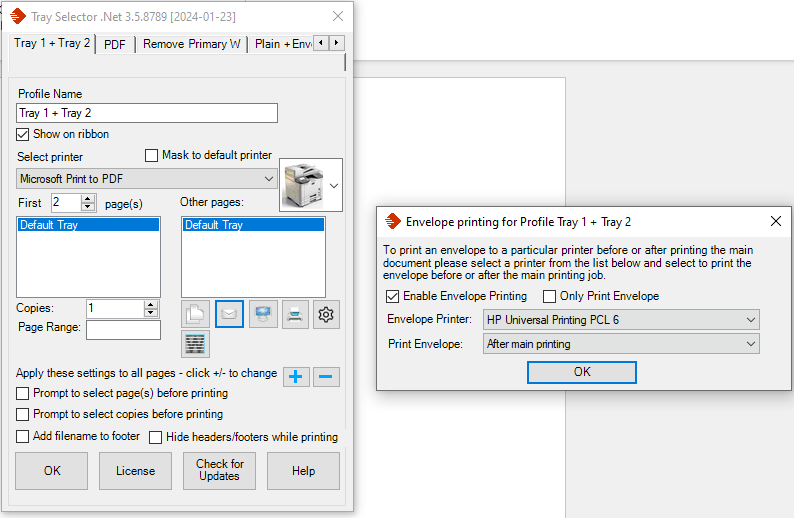
It is also possible that your printer itself has been set up to always select a particular printer tray and ignore any commands that are sent to it. Some printers are also set up to change tray depending on the media type sent to them. The settings vary depending on the printer, but often it is possible to check these settings by scrolling through menu items on the printer’s small LCD display. Normally, changing back to the factory default settings will solve your problem. To test this follow the steps shown in the picture below

If you require any further assistance, please don’t hesitate to get in touch.

Tray Selector copes easily with mail merge documents. Set up your mail merge document in Word and preview it to ensure it is correct. You can use the back and forward buttons shown to check your document.

Once you are sure your data is correct, do not click any of the buttons to merge the document to a new document printer or fax as you would normally do. Instead, click your Tray Selector button. Tray Selector will automatically recognise that the document is a mail merge and display the dialog box to prompt you on your next steps.

If you click ‘Yes’, then each merged letter of your document will be printed using your Tray Selector settings. Clicking ‘No’ will just print the current document (i.e. unmerged), and clicking ‘Cancel’ will print nothing.

Notice that in mail merge mode, Tray Selector will print just one copy of your documents, even if you have set a different number of copies to be printed, and it will not print any extra advanced copies.

More details on mail merge can be found by clicking here.

Click on Start > Control Panel > Add/Remove Programs. Find Tray Selector in the list and click “Remove”

Thanks for your order!

We will process your order and send you your license key and invoice within 24 hours

Please fill out the simple form below and you will be redirected to a download screen to download a zip installer.

*we won’t spam your email, this is just for tracking purposes, don’t worry

BUY TRAY SELECTOR

We have simplified the pricing of Tray Selector and now offer a simple SaaS subscription model which includes all updates and support while subscribed. Please contact contact us for more details. We have also imposed a minimum 10 users per license as the overhead of supporting small numbers of users is too great.

Please fill in the form below to create a new subscription. Once we receive the form we will create and email you a license key as well as an invoice for your first years subscription. The invoice will contain a payment link for your to pay online using our payment partner StripeTM. Once we receive your payment we will extend the license key for a full year.

DOWNLOAD TRAYSELECTOR

Click the button below to download the zip file. Extract to a new folder and run the setup.exe extracted. Further instructions exist in the README file also in the zip. Please contact us if you need help installing or have any questions.

By Clicking the Download button above you agree to our terms and conditions of use