How to Select a Printer Tray with Tray Selector
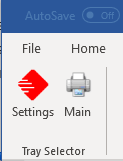
Tray Selector makes it simple for you to select a printer tray profile for your documents. Once you have installed Tray Selector, the next time you open Word you will see the Tray Selector ribbon bar. This consists of two buttons, Main and Settings
To configure Tray Selector for one-click printing, click on Settings.
The Tray Selector dialogue box appears. From here you can configure up to twenty different Tray Selector profiles. Each profile, once configured, appears as a button in the Tray Selector ribbon bar, allowing single-click printing of your chosen printer tray selections. Using this method avoids complex and difficult macros in word.
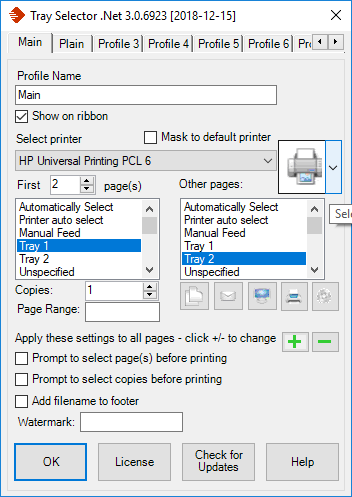
Here are some examples of common Tray Selector profiles:
- Letterhead: Every page is printed on Letterhead paper.
- Letterhead 1st: The first page is printed on Letterhead, with subsequent pages printed on plain paper.
- Plain: All pages are printed on plain paper.
- You can also configure Tray Selector to select printer trays containing coloured paper, envelopes and even labels – all with the click of a single button. No macros in word needed just a simple setup.
How To Configure a Tray Selector Profile Button.
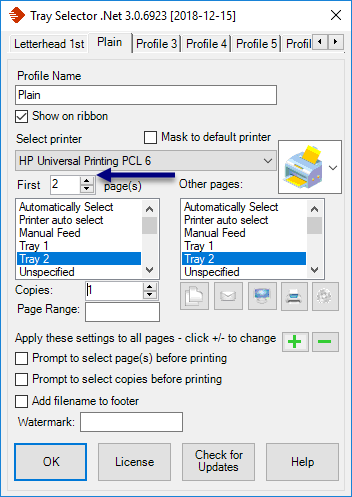
Once you have clicked on Settings, click in the Profile Name box. Now type in a descriptive name for your printer tray selection profile that means something to you.
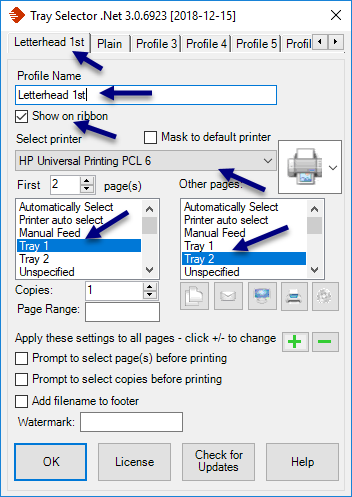
For this example, we are going to use the name Letterhead 1st, as we want a button that, in one click, will print the 1st page on letterhead and every other page on blank paper.
Ensure that the Show in Toolbar tick box is checked (this only happens by default in profile 1).
Under Select Printer, click on the drop-down arrow and select the printer to use for this profile button (all printers you have installed will appear in the dropdown list). The available paper trays for that printer now appear under the First Page and Other Pages boxes.
In the First Page box, select the printer tray from which you want the paper for the first page of your letter/document to come. In this example, our headed paper is stored in the “Tray 1” tray – yours may be different.
In the Other Pages box, select the printer tray from which you want the subsequent pages of your letter/document to come. In this example, we want plain paper for our other pages, which is stored in our “Tray 2” tray – again, yours may be different.
Click OK and your button is setup. Each time it is clicked it will send page 1 to Tray 1 and other pages to Tray 2. By selecting different tabs at the top of the settings dialog you can setup up to 20 different buttons. Say goodbye to macros in word for all your printer tasks.
How to use the Tray Selector button(s) you have created
Once you have setup a button profile using the settings button click OK and you’ll see your button on the ribbon bar. Simply click this button and your current document will be printed in the way you setup. This provides a one click short cut to print over and over again in the way you have pre-set. No need for macros in word just click the Tray Selector buttons.
Set up additional Tray Selector profile buttons
You can have up to twenty different Tray Selector profile buttons for any printer tray selections that you may require. Each of these profiles creates a button in Word to let you print to your chosen combination of paper trays with a single mouse click.
Create an additional Tray Selector profile, click on Settings again, then the Profile 2 tab, and then follow the instructions above to configure your profile. Note that if you have more than one printer, you can allocate different profiles to different printers – just select the appropriate printer from the drop-down menu.
N.B. Make sure for any subsequent profiles that you check the Show in Toolbar tick box.
How to make changes to a Tray Selector Profile
From time to time, you may need to make changes to your existing printer tray selection profiles; for example, you may add a new printer to your system. To make any changes, click on Settings, then select the tab of the profile name you wish to make a change to. Make your changes, click on OK, and your changes will be effective immediately.
How to print more than one copy in each printer tray selection profile button.
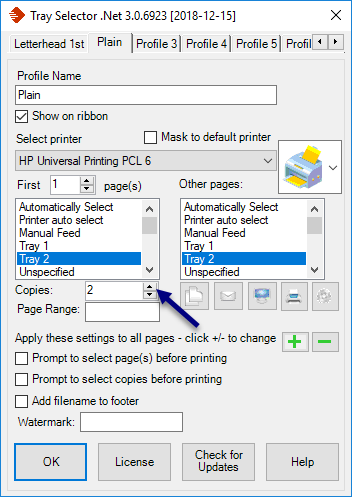
You may have noticed that in each profile tab there is a section that allows you to print a number of different copies of the same document (see the picture). By clicking the arrows buttons or typing the number of copies you can change the number of copies to print. Clicking the profile button now will print this number of copies. No need for macros in word to print extra copies just simply setup the number of copies you need.
What if my printer is duplex/two-sided enabled – can I print the first two pages to a particular tray?
Yes, you can. By default, Tray Selector will only send the first page to the first selected paper tray and all other pages to a different tray. You can, however, change it so that it will print more than one page to the first tray and the remaining pages to a different tray. To do this, simply click the + and – buttons shown in the picture below. For duplex printing, set this option to 2.
Many of our users use Tray Selector with duplex printers. In order to do this, they often add a new printer in the “Add Printers” tab which points to the same physical printer and then name it “….duplex”. They then access the properties of this printer, and turn on the duplex printing so that all pages to this printer will be printed duplex. In Tray Selector, the duplex (and non-duplex) versions of the printer will show in the Select Printer drop-down list, so you can configure profiles to either print duplex or not. This is a very powerful feature of Tray Selector, giving the user single-click access to either duplex or non-duplex printing.
If you are printing duplex to letter-headed paper, there is one important step you must carry out. Due to the way that the paper is routed from the paper bin to the stacked output, almost all duplex printers must print on the back side of the page first. This is then flipped over and the front side is printed, and lastly it is output to the collection tray. This means that headed paper must be inserted in the paper bin the “wrong way round” compared with how it is normally placed in the bin if printing non-duplex. This means that if you are printing to headed paper and the paper is placed in the duplex position in the bin, you must always print duplex (even if you only want to print one page).
If you want to set up two Tray Selector button profiles – one to print duplex and another to print single-sided on the same printer – then you must make a few changes to your system first. We have produced an online duplex printing tutorial to explain how to do this here.
How to print additional copies to a different printer or tray
Tray Selector allows you to print a second print job to another printer with all the usual printer tray selection options. Using this method, you can set up various advanced printing options – for example printing your documents to a PDF file and as a hard copy to a printer – with a single click.
To achieve this, click the “Advanced Copies…” button (as shown below). A new dialogue box will open allowing you to select another printer, tray combination and number of copies to print. By default this feature is turned off. Increase the number of copies from 0 to however many you require to turn it on. You can also select a different or the same printer and chose different tray settings for this extra printer. Once again say adios to macros in word and just use Tray Selector.
Mail merge documents
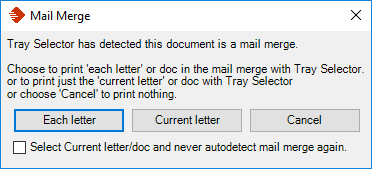
If you have a Mail Merge document and want to print it using Tray Selector it is quite simple. Setup your Mail Merge document in word and preview it to ensure it is correct in the usual way.
Once you are sure your data is correct. At this point do not click finish and merge. Instead click your Tray Selector button. Tray Selector should then automatically recognize that the document is a mail merge and display the dialog box (shown) prompting you to take action.
If you click Each letter then each merged letter of your document will be printed using your Tray Selector settings. Clicking Current letter will just print the current document (i.e. unmerged) and clicking Cancel will print nothing.
You can also check the box to turn off the autodetect of mail merge and always print the current document
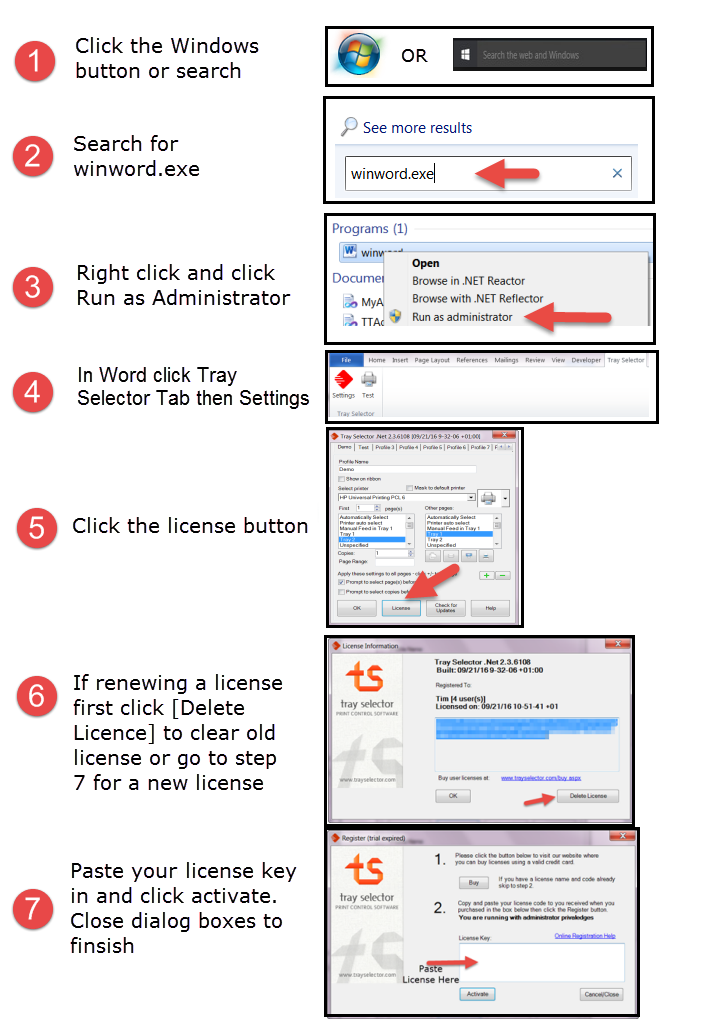
Registering your license key
Which printer button is set to which printer profile?
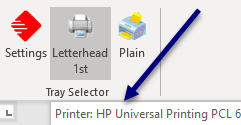
You might forget the number of copies each profile prints or which printer it sends copies to. For a quick reminder, just place your mouse over the profile button and it will show this information as shown. Try doing that with a macro in word!
Print an envelope with the document
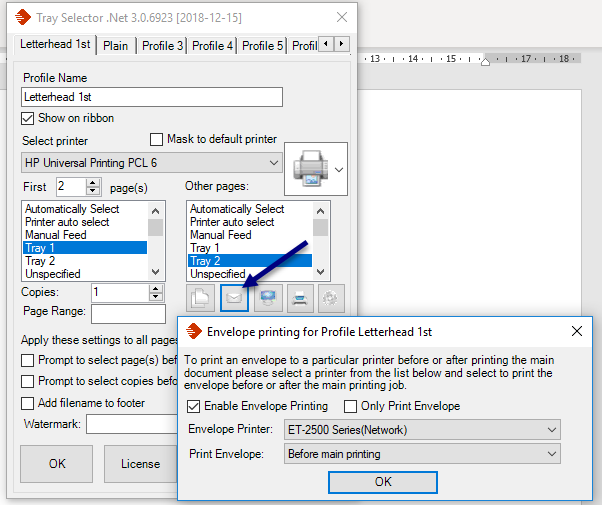
Click the settings button and select the profile from which you want to print an envelope. Click the envelope button on the settings dialog box button. Another dialogue box as shown will appear.
Check the box to enable envelope printing and select the printer you want the envelope to be sent to. Also select an option to state if you want the envelope dialogue box to be shown before or after the main printing. Click OK.
Now, when the profile button is clicked it will also show the normal Word envelopes dialogue box allowing you to print an envelope too. Note that the printer used for envelope printing will be the one you selected. The tray used can be changed within the envelope dialogue box, and once you have selected the printer tray you want to use, this will be remembered for all future envelope printing jobs.
Setting Up Watermarks


Export Button Settings

When you click the “Export” button it will promt you to choose a file to save the settings too. This file is a standard .reg file and can be used by any other user to import these button settings. Normally this can be done by just double clicking the file. Please be careful making changes to the registry and always backup a users registry first. If you are not confident making registry changes please consult your IT support company for help.
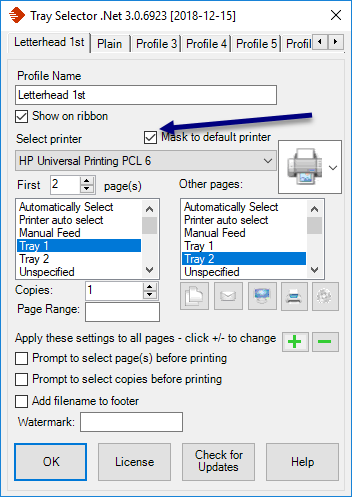
By checking the Mask to default printer checkbox shown Tray Selector will try to use your current default printer even if you setup the particular profile button using a different printer. This can be useful if you have a roaming profile and use different printers within a particular office. Please be aware however that the default printer must be able to support the same settings (e.g. same trays ) to the printer you used to setup the original profile. In other words it works best when an office has all the same or similar types of printers. If this is not the case you might experience some unusual behaviour.
Calling macros in word before or after printing
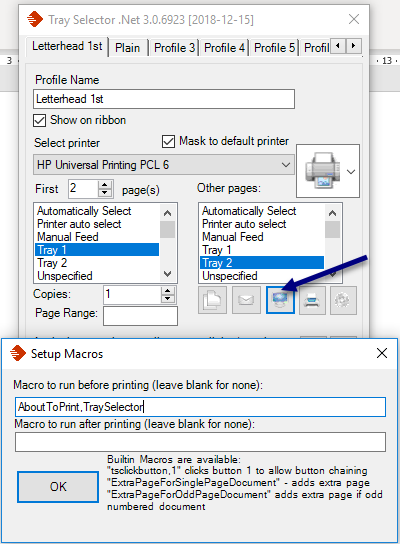
Tray Selector allows you to setup profile buttons that call macros before or after printing. You can define your own macros in files like normal.dot or elsewhere and call them on the settings dialog for each profile there is a macros button (the icon is a computer) shown in the picture below.
Clicking this button will open the macros dialog box allowing you to specify a macro that is run directly before and after the printing assigned to that profile button. Only one macro can be called by you but you can of course call other macros from within your user defined macro.
A macro can be called with up to 5 arguments. String or integer arguments can be supplied. Strings should not be quoted.
So for example if you have defined a macro in your normal.dot file as below
Sub AboutToPrint(s As String)
    MsgBox s
End Sub
that you want to call before your profile prints, then you setup your macros in the dialog box as shown below. Clicking the profile button will now first call AboutToPrint with the string “TraySelector” which will display a MessageBox on the screen. You can call a macro with between zero and 5 arguments. Tray Selector uses a call to Application.Run details hereto run the macros specified.
If you prefix your macro name with a “!” then Tray Selector will use the function CallByName to call the macro details here. This allows maximum flexibility.
You can also chain buttons together to make them call each other. This means that the user only needs to click one button and after the printing has finished, the next button will automatically be called. To do this just call the inbuilt macro TsPrintFromProfile1 to invoke the first button. TsPrintFromProfile1 up to TsPrintFromProfile20 exist. Be careful not to create a loop or TraySelector will loop around clicking each profile button.
Clicking Tray Selector buttons and access other functions from your own macros.
The following VBA examples shows how this is achieved along with an example of how to make changes for number of copies etc.
Example 1. Simply click the first Tray Selector button
Sub ClickFirstButton()
    On Error GoTo TsErr
    Set tsModule = Application.COMAddIns("TraySelectorOne.AddinModule").Object
    ' Click the first tray selector button buttons are numbered starting from 1 even if they are not shown on the ribbon/toolbar.
    Call tsModule.ClickProfileButton(1)
    On Error GoTo 0
    Exit Sub

TsErr:
    MsgBox ("Error Calling TraySelector Interface")
End Sub
Example 2. More complex
Sub CallTraySelector()
    On Error GoTo TsErr
    Set tsModule = Application.COMAddIns("TraySelectorOne.AddinModule").Object

    ' Set button 1 to print two copies
    Call tsModule.SetProfileButtonCopies(1, 2)
    ' Set button 1 to have two extra copies
    Call tsModule.SetProfileButtonCopiesExtra(1, 2)
    ' Set the document protect passsword in case the document is protected
    Call tsModule.SetDocumentProtectPassword("secret")

	' Set a page range for the next profile printed (works for all profiles) available from version 1.2.4 upwards
    Call tsModule.SetNextPageRange("2-3")

    ' Click the first tray selector button buttons are numbered starting from 1 even if they are not shown on the ribbon/toolbar.
    Call tsModule.ClickProfileButton(1)

	' Clear the page range set above
    Call tsModule.ClearNextPageRange

    ' set the profile button copies back to 1
    Call tsModule.SetProfileButtonCopies(1, 1)
    ' set the profile button copies for the extra copies back to 1
    Call tsModule.SetProfileButtonCopiesExtra(1, 1)

    On Error GoTo 0
    Exit Sub

TsErr:
    MsgBox ("Error Calling TraySelector Interface")
End Sub
