Chain together at Tray Selector, we are sometimes asked if it is possible to print 3 copies of a document to different trays in a single click. It is simple to setup a button to click 2 copies to different trays using the extra copies button but we can also print in three different ways. Let’s see how. First let’s print to two different trays as shown below:
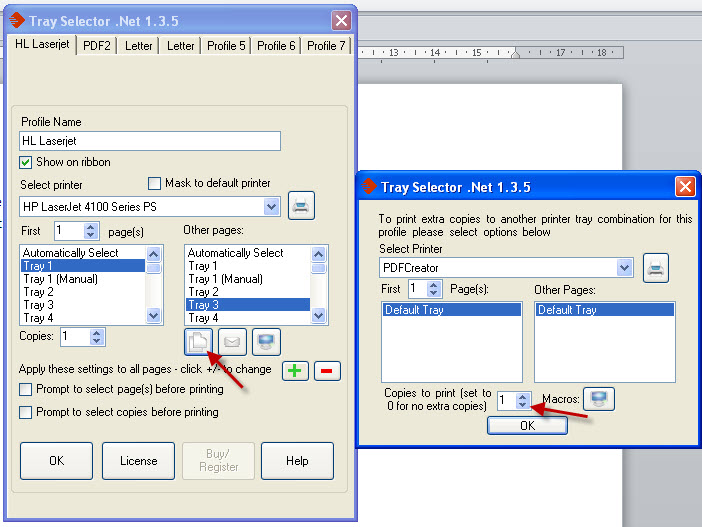 So that’s easy enough but what if we want a third copy sent to say Tray 2 to get a copy of our document on say pink paper which is in Tray 2?
In this case we’d normally have to use two buttons. The first button setup, as above, to print on say “Headed” (Tray 1) for the first page and then “Plain” to Tray 3, followed by an extra copy of all pages to PDF. Then we’d need to setup a new button to print out on the pink paper from Tray 2 as shown below.
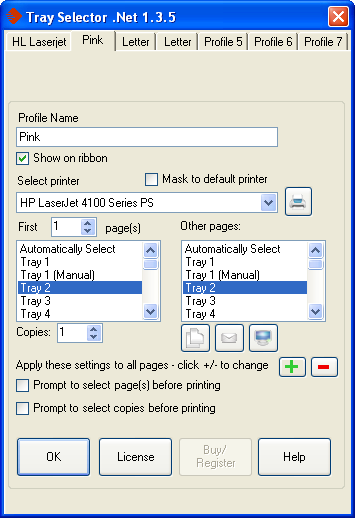
So that’s easy enough but what if we want a third copy sent to say Tray 2 to get a copy of our document on say pink paper which is in Tray 2?
In this case we’d normally have to use two buttons. The first button setup, as above, to print on say “Headed” (Tray 1) for the first page and then “Plain” to Tray 3, followed by an extra copy of all pages to PDF. Then we’d need to setup a new button to print out on the pink paper from Tray 2 as shown below.
 The problem is that a user would need to first click the “HP Laserjet” button to get their copy on headed and plain and a copy to PDF. After that then click the “Pink” button to get their pink paper copy from Tray 2. But that’s 2 clicks and at Tray Selector we like to be able to do this in a single click!
 The text “tsclickbutton,2” tells Tray Selector that once all the printing is finished for the “HL Laserjet” button, then call button 2 e.g. the “Pink” button and this produces the 3rd pink copy as required.
Note you can only put this command into the “Macros to run after printing” box on the macros dialog only on the main settings dialog box, for your button. You cannot put it on on the macros dialog in the extra copies dialog box. You also can’t put it in the “Macros to run before printing..” sections on either dialog. Finally just to neaten things up you might want to un-check the “Show on ribbon” checkbox for the pink button so that users now just see a single button to print out the three copies.
What if I accidentally setup some buttons to cause a cycle in my buttons will they just keep clicking and burning up paper on my printer(s)? No. We’ve thought of that and we’ve put a limit so that no more than 12 buttons can be chained in a row so worst case you shouldn’t do too much damage.
The text “tsclickbutton,2” tells Tray Selector that once all the printing is finished for the “HL Laserjet” button, then call button 2 e.g. the “Pink” button and this produces the 3rd pink copy as required.
Note you can only put this command into the “Macros to run after printing” box on the macros dialog only on the main settings dialog box, for your button. You cannot put it on on the macros dialog in the extra copies dialog box. You also can’t put it in the “Macros to run before printing..” sections on either dialog. Finally just to neaten things up you might want to un-check the “Show on ribbon” checkbox for the pink button so that users now just see a single button to print out the three copies.
What if I accidentally setup some buttons to cause a cycle in my buttons will they just keep clicking and burning up paper on my printer(s)? No. We’ve thought of that and we’ve put a limit so that no more than 12 buttons can be chained in a row so worst case you shouldn’t do too much damage.
So that’s easy enough but what if we want a third copy sent to say Tray 2 to get a copy of our document on say pink paper which is in Tray 2?
In this case we’d normally have to use two buttons. The first button setup, as above, to print on say “Headed” (Tray 1) for the first page and then “Plain” to Tray 3, followed by an extra copy of all pages to PDF. Then we’d need to setup a new button to print out on the pink paper from Tray 2 as shown below.
The problem is that a user would need to first click the “HP Laserjet” button to get their copy on headed and plain and a copy to PDF. After that then click the “Pink” button to get their pink paper copy from Tray 2. But that’s 2 clicks and at Tray Selector we like to be able to do this in a single click!
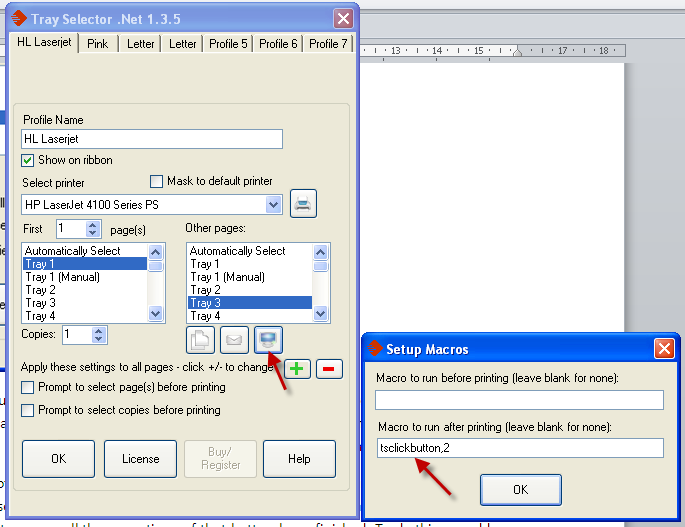
Button Chaining
From version 1.3.5 (Dot Net) and 1.6.9 (Standard) we’ve introduced a new concept called “button chaining” that allows users to do this. Button chaining allows a user to automatically fire off the clicking of another button once all the operations of the first button have finished. To do this we add a text entry in the “macros” dialog for the first button as shown below.
The text “tsclickbutton,2” tells Tray Selector that once all the printing is finished for the “HL Laserjet” button, then call button 2 e.g. the “Pink” button and this produces the 3rd pink copy as required.
Note you can only put this command into the “Macros to run after printing” box on the macros dialog only on the main settings dialog box, for your button. You cannot put it on on the macros dialog in the extra copies dialog box. You also can’t put it in the “Macros to run before printing..” sections on either dialog. Finally just to neaten things up you might want to un-check the “Show on ribbon” checkbox for the pink button so that users now just see a single button to print out the three copies.
What if I accidentally setup some buttons to cause a cycle in my buttons will they just keep clicking and burning up paper on my printer(s)? No. We’ve thought of that and we’ve put a limit so that no more than 12 buttons can be chained in a row so worst case you shouldn’t do too much damage.