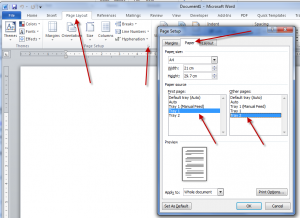
 Page Setup to select trays
Once you have installed and setup a multi-tray printer you might like to try to print a document to different printer trays. Open a word document and create a two page document.
- Select your new printer under file->Print (if it’s not the default)
- Click the page layout tab
- Click the small triangle at the bottom right
- Open the page setup dialog box and click the page Paper Tab
- Choose a tray for the first page and other pages. Close the dialog box and print.
This is shown in the image.
Once you have this all setup and working you can install Tray Selector and automate the process you can then store particular print actions under a button in the ribbon bar and access them in a single click (as shown below).

In order to achieve this result time and time again without requiring you to change settings in page-setup you should install Tray Selector and try out our free 30 day trial. You should soon see the benefits of a modern muti-function printer. For busy law firms its clear that by automating this process in a single-click you’ll save time and money and ensures expensive paper is not wasted.
Trouble Shooting
Some printer and printer drivers appear to be setup to ignore Microsoft Word’s page tray selection instructions and always print to the same printer tray. This is often solved by setting the tray selection setting in the printer driver to “auto select”.


